C_S4CPB시험덤프공부 & C_S4CPB최신버전덤프공부
Wiki Article
만약 아직도SAP C_S4CPB시험패스를 위하여 고군분투하고 있다면 바로 우리 ITDumpsKR를 선택함으로 여러분의 고민을 날려버릴 수 잇습니다, 우리 ITDumpsKR에서는 최고의 최신의 덤프자료를 제공 합으로 여러분을 도와SAP C_S4CPB인증자격증을 쉽게 취득할 수 있게 해드립니다. 만약SAP C_S4CPB인증시험으로 한층 업그레이드된 자신을 만나고 싶다면 우리ITDumpsKR선택을 후회하지 않을 것입니다, 우리ITDumpsKR과의 만남으로 여러분은 한번에 아주 간편하게SAP C_S4CPB시험을 패스하실 수 있으며,SAP C_S4CPB자격증으로 완벽한 스펙을 쌓으실 수 있습니다,
성공을 위해 길을 찾고 실패를 위해 구실을 찾지 않는다는 말이 있습니다. SAP인증 C_S4CPB시험이 영어로 출제되어 시험패스가 너무 어렵다 혹은 회사다니느라 공부할 시간이 없다는 등등은 모두 공부하기싫은 구실에 불과합니다. ITDumpsKR의 SAP인증 C_S4CPB덤프만 마련하면 실패를 성공으로 바꿀수 있는 기적을 체험할수 있습니다.제일 간단한 방법으로 가장 어려운 문제를 해결해드리는것이ITDumpsKR의 취지입니다.
최신 C_S4CPB시험덤프공부 인증 시험덤프
ITDumpsKR는ITDumpsKR의SAP인증 C_S4CPB덤프자료를 공부하면 한방에 시험패스하는것을 굳게 약속드립니다. ITDumpsKR의SAP인증 C_S4CPB덤프로 공부하여 시험불합격받으면 바로 덤프비용전액 환불처리해드리는 서비스를 제공해드리기에 아무런 무담없는 시험준비공부를 할수 있습니다.
최신 SAP Certified Associate C_S4CPB 무료샘플문제 (Q10-Q15):
질문 # 10
SIMULATION
Business Scenario You are working on an implementation project and need to create a test user in the system for demonstrating the professional services business processes to project managers during your upcoming Fit-to-Standard workshop. Follow the instructions below to create a new test user with a basic import of worker and work agreement data.
Note: In the task below, always replace ###### with the last 6 digits of your group number.
Note:
Make sure to use the EXACT names/values/spaces as they are listed in the task.
Even forgetting a space or a number will cause the validation of the task to fail and be marked as incorrect.
Task:
Create a new business user with the following information by importing the new user's data: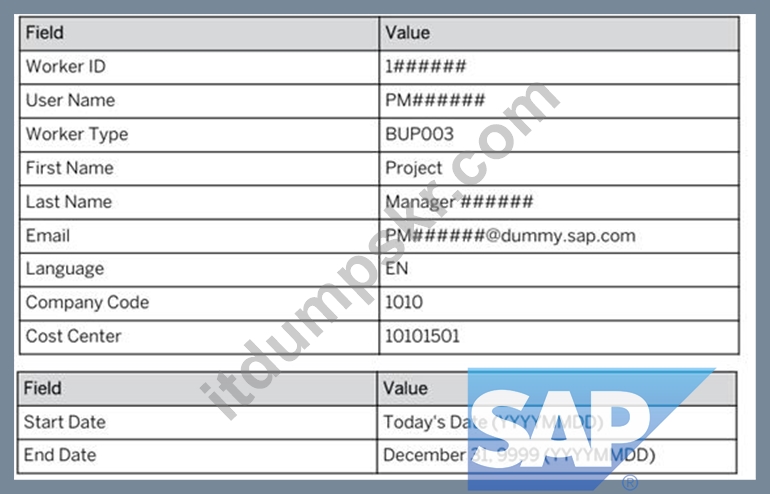
Import Name: Project Manager Test User ######
정답:
설명:
See Explanation below for all solution
Explanation:
Objective
The purpose of this task is to create a test user in SAP S/4HANA Cloud for demonstrating professional services business processes to project managers during a Fit-to-Standard workshop.
This task is completed by importing:
worker data
work agreement data
The import must use the exact values provided in the task.
Business Scenario Explanation
In this scenario, you need a test user that represents a Project Manager.
This user is needed so that project-management-related professional services processes can later be demonstrated in the system.
Instead of creating every record manually, SAP asks you to use the import process.
This is faster and also ensures the worker and agreement data are loaded in the correct structure.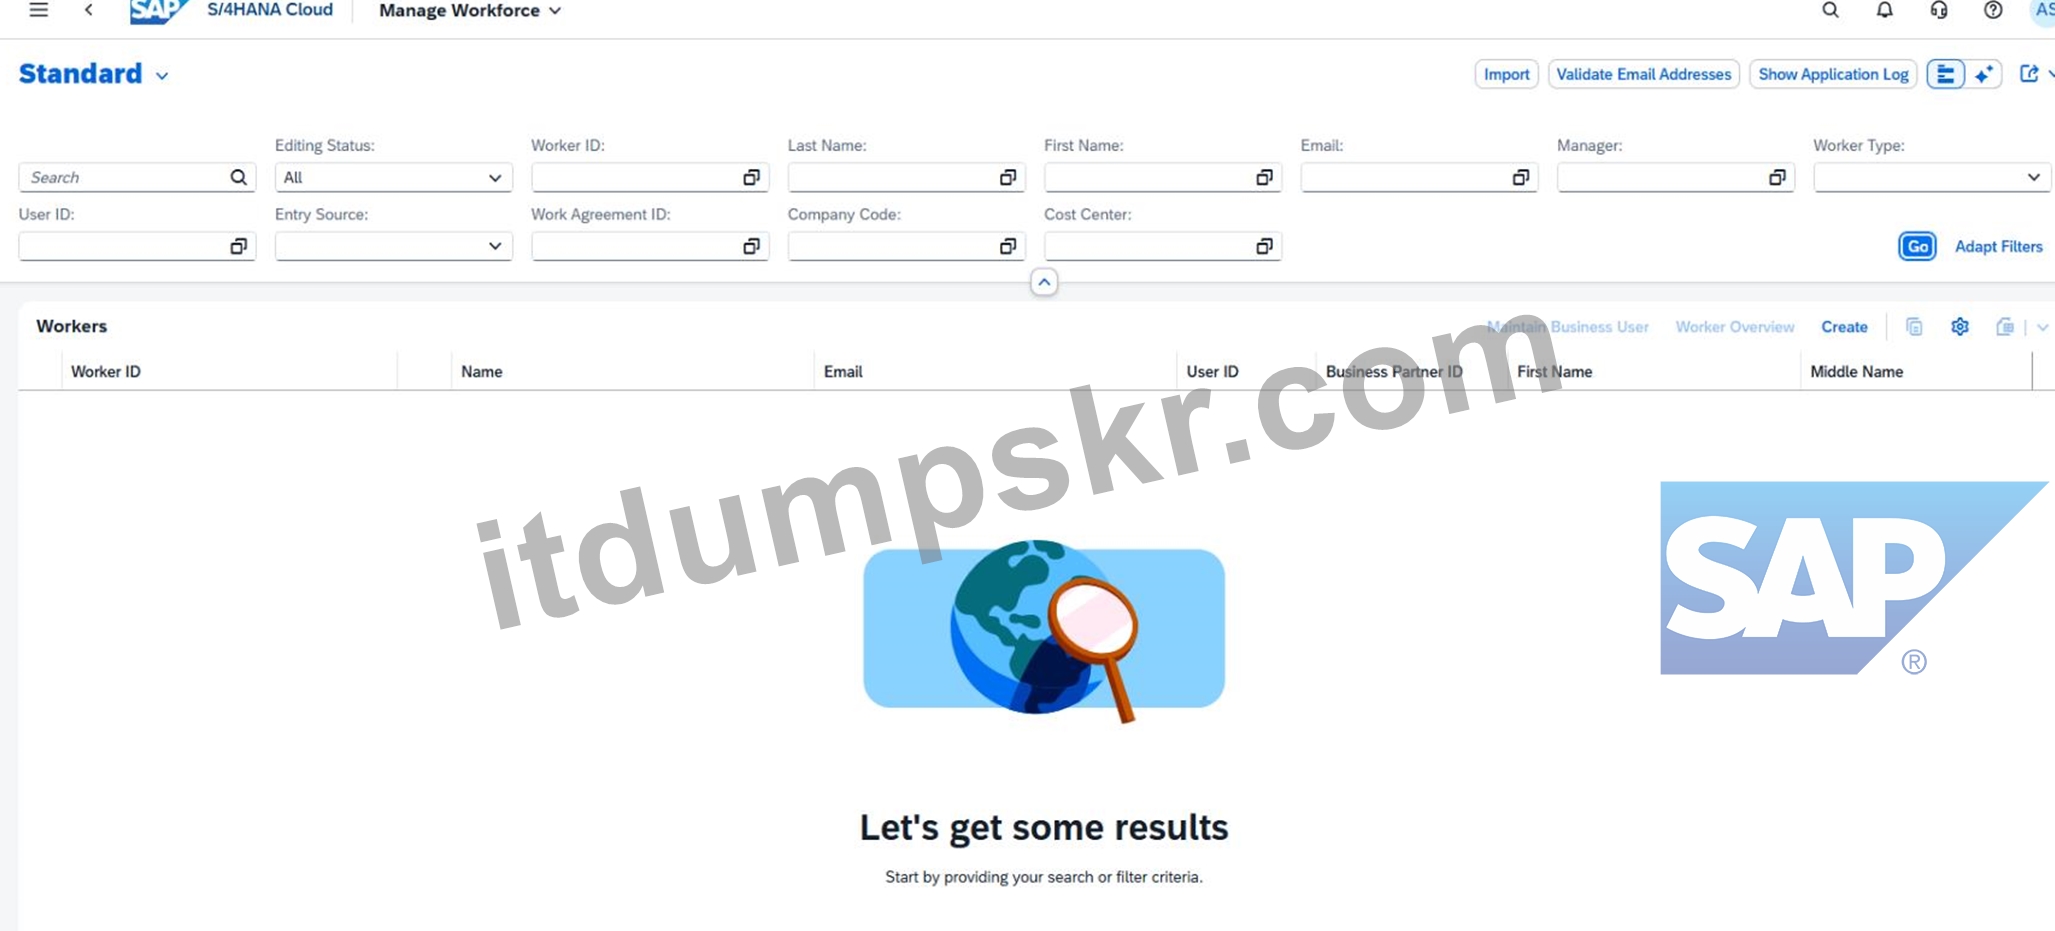
Important Notes
Always replace ###### with the last 6 digits of your group number.
Use the values exactly as provided.
Do not change spaces, punctuation, or capitalization unless the task explicitly tells you to.
A wrong value, extra space, or missing number can cause task validation failure.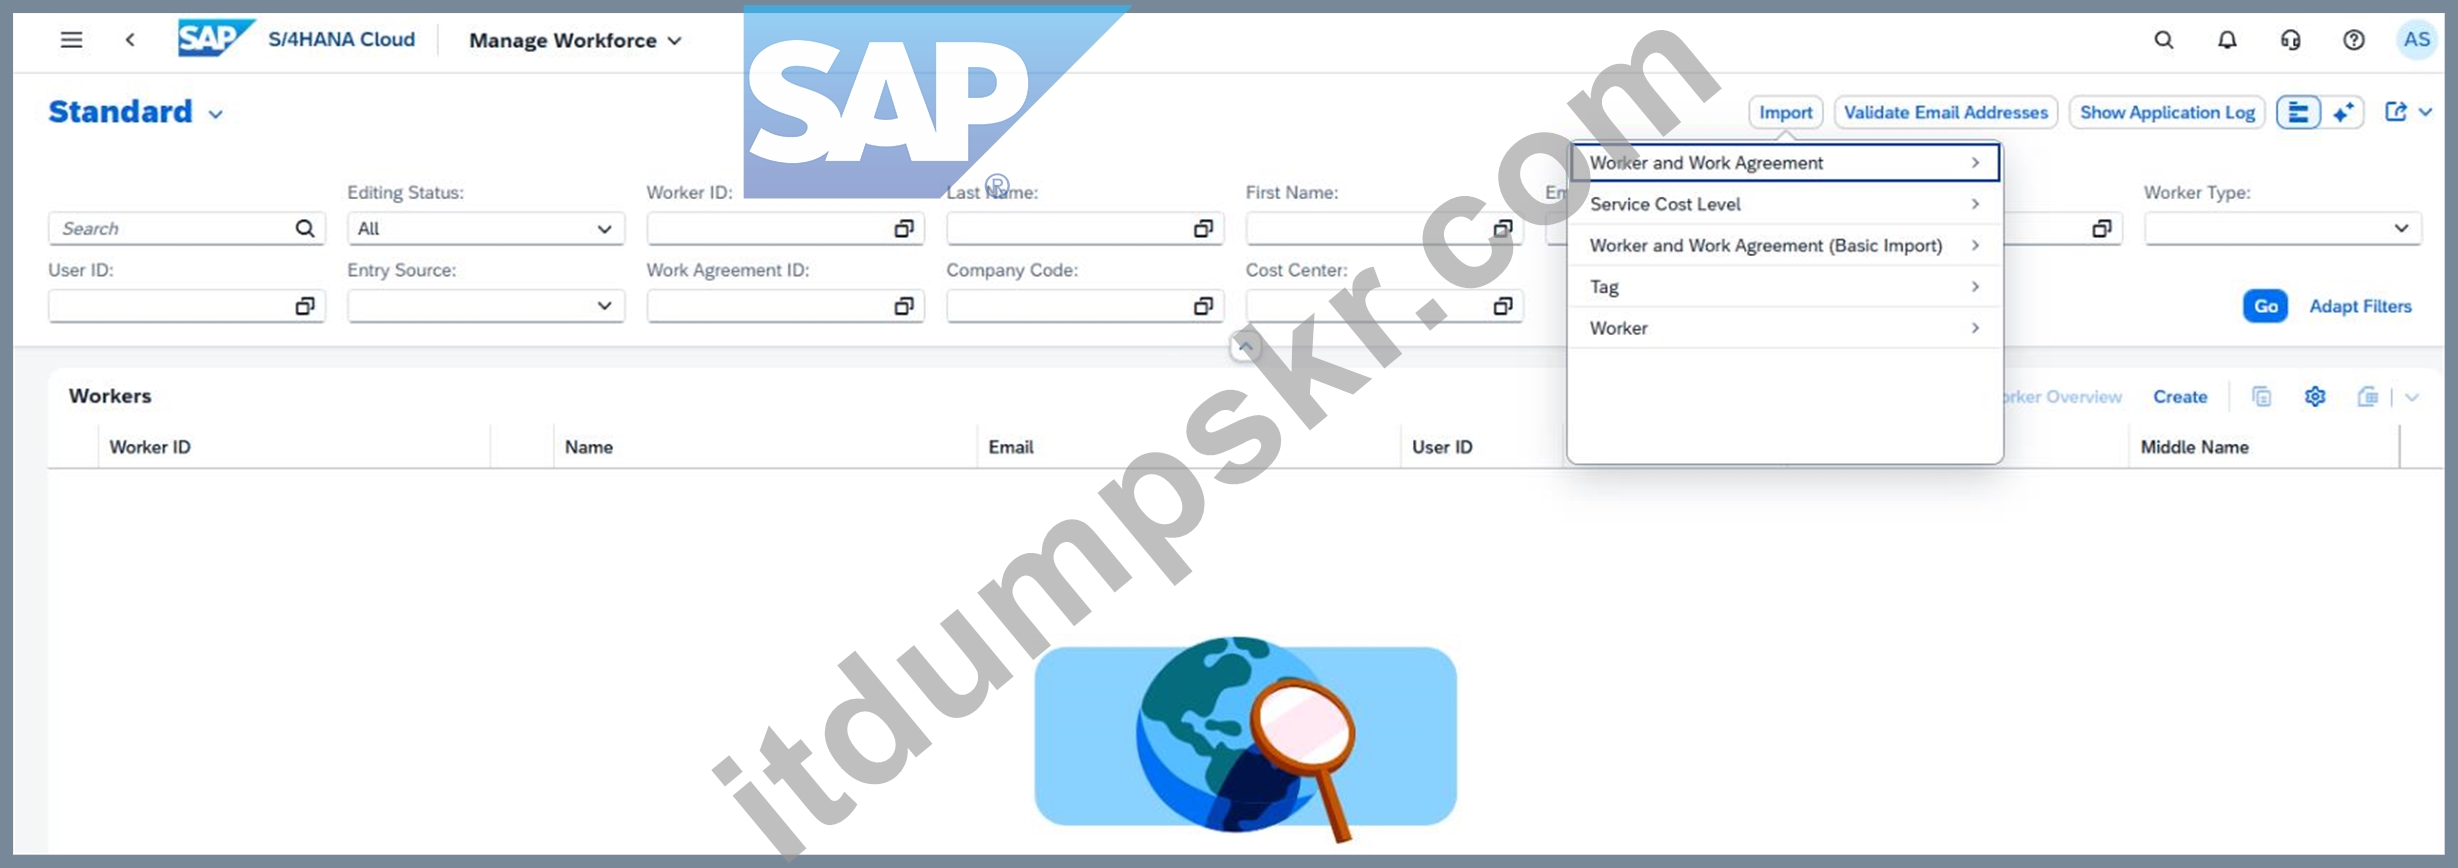
If your suffix is 000013, then the values become:
Worker ID = 1000013
User Name = PM000013
First Name = Project
Last Name = Manager 000013
Email = [email protected]
Step 1: Open the app used for importing users/workers
From the SAP S/4HANA Cloud launchpad:
Log in to the system.
Open the relevant import app used in your simulation for importing worker and work agreement data.
Start creation of a new import.
Explanation:
This task is not done by manual user creation only.
The scenario specifically says to create the new business user by importing the new user's data.
The import will load the basic worker and work agreement records that are required before the business user is fully usable.
Step 2: Enter the import name
When creating the import:
In the field Import Name, enter:
Project Manager Test User ######
Replace ###### with your own 6-digit group suffix.
Example
For suffix 000013, enter:
Project Manager Test User 000013
Explanation:
The import name identifies your import package and should be entered exactly as required by the task.
Step 3: Prepare the worker data
In the worker import structure, enter these values:
Worker ID = 1######
User Name = PM######
Worker Type = BUP003
First Name = Project
Last Name = Manager ######
Email = PM######@dummy.sap.com
Language = EN
Company Code = 1010
Cost Center = 10101501
Example for 000013
Worker ID = 1000013
User Name = PM000013
Last Name = Manager 000013
Email = [email protected]
Explanation:
These values define the person as a project manager test worker and connect the worker to:
the company code,
the cost center,
the default language,
and the worker type required by the scenario.
Step 4: Prepare the work agreement data
In the work agreement import structure, enter:
Start Date = today's date in YYYYMMDD format
End Date = 99991231
Example
If today's date is March 30, 2026:
Start Date = 20260330
End Date = 99991231
Explanation:
The end date 99991231 is used to indicate an open-ended validity.
This is common in SAP for a record that should remain valid indefinitely.
Step 5: Upload or enter the import data
Depending on the app behavior in your exercise:
Upload the prepared import file or
Enter the values into the import structure manually if the system provides inline entry.
Explanation:
The business scenario says the business user must be created by importing worker and work agreement data.
This means the relevant master data must be loaded into the system first before the user is fully available.
Step 6: Start the import
After all values are entered:
Validate the data if the system provides a validation option.
Start the import.
Explanation:
Validation checks whether:
required fields are filled,
date formats are correct,
codes like BUP003, 1010, and 10101501 are valid,
and the import structure is complete.
Step 7: Wait for the import to complete
Monitor the import process.
Wait until the import shows success or completed status.
Explanation:
Only after the import is complete will the worker and work agreement records exist in the system and be usable for further user setup and role assignment.
Step 8: Verify the imported worker/business user
After the import finishes:
Open the relevant business user / worker maintenance app.
Search using:
Worker ID
or User Name
Confirm that the imported user exists.
Explanation:
This step ensures the imported data was actually created and is available for later process demonstrations.
Expected Result
After the import is completed successfully:
a new test worker/user exists in the system,
the worker has the required professional-services identity,
the work agreement is valid,
the user can be used in later project manager demonstrations.
질문 # 11
SIMULATION
Create a Custom Launchpad Space and Page
Business Scenario
You are building a custom business role that will be assigned to all employees in the organization. The business role and its corresponding Launchpad Space and Page need to include the apps that have been granted through the business catalogs assigned to the business role to ensure employees have an easy time finding the relevant applications.
Note: In the task below, always replace ###### with the last 6 digits of your group number.
Note:
Make sure to use the EXACT names/values/spaces as they are listed in the task.
Even forgetting a space or a number will cause the validation of the task to fail and be marked as incorrect.
Task:
Assign the Launchpad Space to your custom business role. Edit the Launchpad Page to add the applications listed below as tiles (standard "preferred" square tile) with the Section Title: Self-Services.
Manage My Timesheet
Concur Travel Expense
정답:
설명:
See Explanation below for all solution
Explanation:
Objective
The purpose of this task is to complete the launchpad setup for the custom all-employee role by:
assigning the custom Launchpad Space to the business role,
editing the Launchpad Page,
creating a section titled Self-Services,
adding the required applications as standard preferred square tiles:
Manage My Timesheet
Concur Travel Expense
Business Scenario Explanation
In the earlier tasks, you created:
a custom all-employee business role,
the required business catalog assignments,
a custom launchpad space and page.
This task completes that setup by adding the actual application tiles that end users will see on the launchpad.
The goal is to make it easy for employees to find the relevant self-service applications without searching manually.
Important Notes
Always replace ###### with the last 6 digits of your group number.
Use the exact values listed in the task.
The section title must be exactly:
Self-Services
The two tiles must be:
Manage My Timesheet
Concur Travel Expense
Save after editing the page.
Prerequisites
Before doing this task, the following should already exist:
custom business role:
Z_EMPLOYEES_ALL_######
assigned business catalogs:
SAP_HCM_BC_EMP_PC
SAP_CON_BC_CTE_ESS_PC
custom launchpad space and page created for the role
page title and description:
General
Detailed Step-by-Step Procedure
Step 1: Open the app "Maintain Business Roles"
From the SAP S/4HANA Cloud launchpad:
Log in to SAP S/4HANA Cloud.
Search for:
Maintain Business Roles
Open the app.
Explanation:
This is the app where the custom all-employee role is maintained. The launchpad space assignment and page navigation are controlled from here.
Step 2: Open the custom all-employee business role
In Maintain Business Roles:
Search for your custom business role:
Z_EMPLOYEES_ALL_######
Open the role.
Example
If your suffix is 000013, the role is:
Z_EMPLOYEES_ALL_000013
Explanation:
You must work in the custom all-employee role because the launchpad space and page belong to this role.
Step 3: Open the Launchpad Spaces tab
Inside the role:
Click:
Launchpad Spaces
Explanation:
This tab shows which launchpad space is assigned to the role.
Step 4: Verify the Launchpad Space is assigned
Check that the assigned space exists.
In your execution, the assigned space followed this pattern:
Z_ALL_EMP_######
Explanation:
The task says to assign the launchpad space to the custom business role.
If the space already appears in the assigned list, then this part is already complete.
If the space is not listed:
Click Add
Create or assign the required custom space
Save the role
Step 5: Open the assigned Launchpad Space
In the assigned launchpad spaces list:
Click the arrow > at the far right of the space row.
Explanation:
This opens Space Details, where the page linked to the space can be accessed.
Step 6: Open the Pages tab
In Space Details:
Click:
Pages
Explanation:
A space can contain one or more pages.
This task requires you to edit the page content.
Step 7: Open the Launchpad Page
In the Pages list:
Open the page row by clicking the arrow > at the far right.
In your run, the page followed this pattern:
Z_ALL_EMP_######
Explanation:
This opens Page Details, where the page content can be edited.
Step 8: Open Page Content
Inside Page Details:
Click the tab:
Page Content
Explanation:
This is the area where sections and application tiles are maintained.
Step 9: Click Edit
On the Page Content screen:
Click Edit
Explanation:
The page must be in edit mode before you can create sections or add app tiles.
Step 10: Enter the section title
In the section title field, enter exactly:
Self-Services
Explanation:
This creates the section in which the required employee self-service app tiles will be placed.
The title must match the task exactly.
Step 11: Add the tile "Concur Travel Expense"
On the right side of the page content screen, in the list of apps derived from the assigned catalogs:
Find:
Concur Travel Expense
Click:
Add
Explanation:
This adds the Concur employee self-service app tile into the Self-Services section.
Step 12: Add the tile "Manage My Timesheet"
Still on the right side app list:
Find:
Manage My Timesheet
Click:
Add
Explanation:
This adds the timesheet app tile into the same Self-Services section.
Step 13: Verify both tiles are visible in the section
After adding both apps, confirm that the page content now shows:
Concur Travel Expense
Manage My Timesheet
under the section:
Self-Services
Explanation:
This confirms the tiles were placed correctly on the page.
Step 14: Save the page
Click:
Save
Explanation:
This finalizes the page changes.
If you do not save, the tiles and section will not be retained.
Step 15: Verify the role is assigned to your business user
To verify the page and tiles from the home screen, make sure the custom all-employee role is assigned to your own business user.
Open:
Maintain Business Users
Then:
Open your own user
Open Assigned Business Roles
Confirm the role is assigned:
Z_EMPLOYEES_ALL_######
Save if needed
Explanation:
Without role assignment, the launchpad space and page may not appear on the homepage for your user.
Step 16: Refresh the homepage
Go back to Home.
Then:
Refresh the browser or reload the session
Open the page/tab:
General
Explanation:
This ensures the launchpad updates and shows the newly added content.
Step 17: Verify the result on the homepage
On the General page, verify that you can see:
section title:
Self-Services
tile:
Concur Travel Expense
tile:
Manage My Timesheet
Explanation:
This is the final proof that the task was completed successfully.
Expected Result
After this task is completed successfully:
the custom launchpad space is assigned to the business role,
the page contains a section named Self-Services,
the page shows the tiles:
Concur Travel Expense
Manage My Timesheet
the tiles are visible on the launchpad homepage under the General page.
질문 # 12
SIMULATION
Business Scenario
You are working on an implementation project and need to assign yourself the Administrator business role to complete your job tasks. Follow the instructions below to assign the Administrator business role to your user.
Prerequisites Note:
In the task below, always replace ###### with the last 6 digits of your group number.
Your Task 1.
Assign the Administrator (BR_ADMINISTRATOR) business role to your user and save.
정답:
설명:
See Explanation below for all solution
Explanation:
Task 1: Assign the Administrator Business Role to Your User
Objective
The purpose of this task is to assign the standard SAP business role Administrator to your own business user so you can perform the required configuration and administration activities in SAP S/4HANA Cloud.
The required business role is:
Business Role ID: BR_ADMINISTRATOR
Business Role Description: Administrator
For your exercise, you must always replace ###### with the last 6 digits of your group number. In your case, this was done with your own group suffix during execution.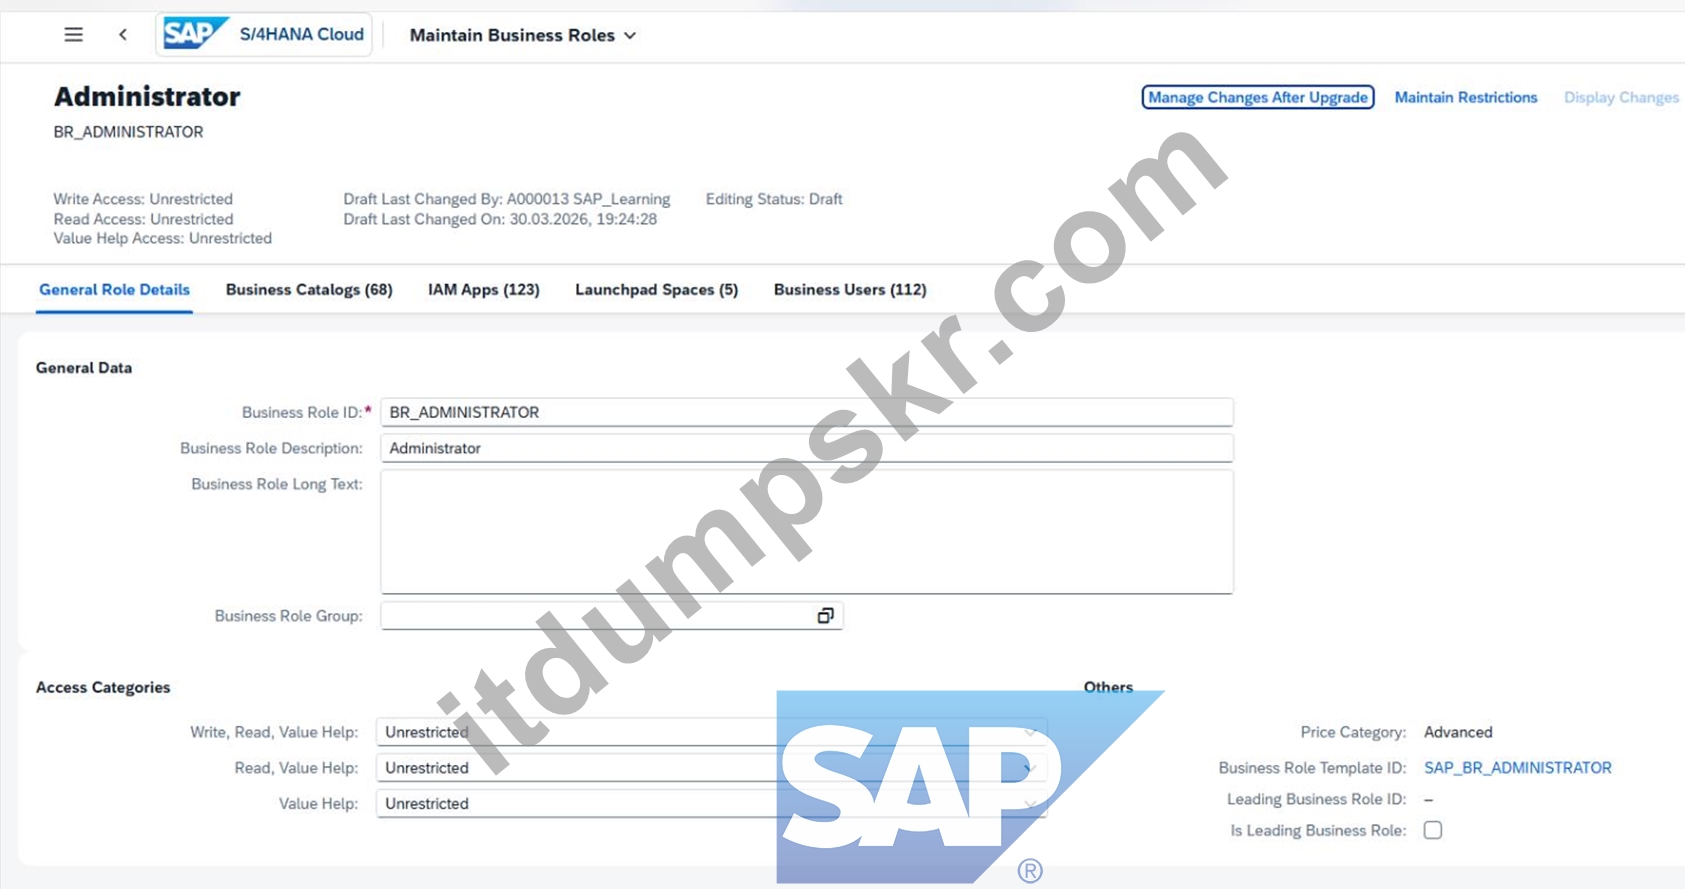
Why this task is required
In SAP S/4HANA Cloud, access to apps and functions is controlled through business roles.
Without the Administrator role, your user may not be able to:
open administration apps,
maintain configuration-related master data,
assign other roles,
proceed with later project tasks.
So this task is the first access-enablement step.
Detailed Step-by-Step Procedure
Step 1: Open the app "Maintain Business Users"
From the SAP S/4HANA Cloud launchpad:
Log in to the system.
Use the search bar or app finder.
Search for:
Maintain Business Users
Open the app.
This app is used to maintain business users and assign or remove business roles.
Step 2: Search for your own user
Inside Maintain Business Users:
In the search/filter area, locate the field for User Name or search criteria.
Enter your own user ID.
Click Go.
For example, in your exercise you used your own SAP Learning user.
You must open your own business user because the Administrator role needs to be assigned to your personal user record.
Step 3: Open your user record
After the search results appear:
Click your user entry in the list.
Open the user details screen.
This takes you to the detailed maintenance page where business roles can be reviewed and assigned.
Step 4: Switch to Edit mode
In the business user detail screen:
Click Edit.
Without entering edit mode, the role assignment list is display-only and cannot be changed.
Step 5: Go to Assigned Business Roles
Inside your business user:
Open the tab:
Assigned Business Roles
Review the currently assigned roles.
This tab shows all business roles already assigned to your user and is the correct place to add new ones.
Step 6: Click Add
In the Assigned Business Roles section:
Click Add.
This opens the dialog:
Add Business Roles
The Add dialog is used to search and select standard SAP-delivered business roles.
Step 7: Search for the Administrator role
In the Add Business Roles popup:
In the field Business Role ID, enter:
BR_ADMINISTRATOR
Click Go.
Select the role:
Administrator
Business Role ID: BR_ADMINISTRATOR
This is the standard Administrator role required by the task.
You must select the exact standard role, not a custom role.
Step 8: Add the role
After selecting BR_ADMINISTRATOR:
Click OK or Apply, depending on the popup behavior.
Confirm that the role is added to the list of assigned business roles.
At this point the role is added to your draft changes, but not yet finally saved.
Step 9: Save the user
Back in the business user detail screen:
Click Save.
This is the final and mandatory step.
If you do not save, the Administrator role remains only in draft and is not actually assigned.
Step 10: Verify the assignment
After saving:
Check the Assigned Business Roles list.
Confirm that the Administrator role appears in the list:
BR_ADMINISTRATOR
Expected Result:
Your user now has the Administrator business role assigned successfully.
What to verify after completion
You should verify the following:
Your user record is saved successfully.
The role Administrator is visible in the assigned roles list.
No draft remains unsaved.
Later administration apps are available to your user.
질문 # 13
SIMULATION
Note: In this practical certification exam, you will only be given high-level instructions. The step descriptions are complete and tested to work. They are not detailed, as this is a test of your knowledge of navigating the system on your own.
Caution: Please make sure you are always using your assigned group number. The last 6 digits are denoted as ###### in the following tasks. Your results will not be recorded if you are not using your own group number. To find your group number: Select your user in the top right corner. You will see your user name with a series of numbers. Use the last 6 digits as your group number Caution: To keep the system running smoothly and avoid unnecessary costs, please follow the assigned exercises carefully when using the SAP Landscape. Avoid going beyond the exercise scope and only use your group number to help maintain a stable and efficient environment for everyone.
정답:
설명:
See Explanation below for all solution
Explanation:
Purpose: Identify your own six-digit suffix and use it consistently in every task.
Open the user menu at the top-right of SAP S/4HANA Cloud.
Read your user name and note the last six digits.
Use those last six digits in every place the task PDF shows ######.
Example used in this guide: 000013
질문 # 14
SIMULATION
Set up an Integration Scenario
Business Scenario
You are responsible for setting up the Bank Integration with File Interface (1EG). During an actual implementation, you would first download the Set-up Instructions for the business process from SAP Signavio Process Navigator. In this practical exam, all the information will be provided to you, so you do not need to download the Set-up Instructions.
Prerequisites
Note:
In the task below, always replace ###### with the last 6 digits of your group number.
Note:
Make sure to use the EXACT names/values/spaces as they are listed in the task. Even forgetting a space or a number will cause the validation of the task to fail and be marked as incorrect.
Your Task
Create a Communication User with the information listed below and save.
정답:
설명:
See Explanation below for all solution
Explanation:
Objective
The purpose of this task is to create a new Communication User for the integration scenario Bank Integration with File Interface (1EG).
This communication user will later be used in the integration setup, especially when defining the communication system and communication arrangement.
Business Scenario Explanation
In this scenario, you are setting up the integration for:
Bank Integration with File Interface (1EG)
In SAP S/4HANA Cloud, technical communication between systems is usually handled through:
a Communication User
a Communication System
a Communication Arrangement
This task is the first step in that chain.
The communication user acts as the technical user that the system uses for integration-related authentication.
Important Notes
Always replace ###### with the last 6 digits of your group number.
Use the exact values shown in the task.
Do not change spaces, underscores, or capitalization.
The password should not be typed manually if the task says:
Have the system propose a password
Required Values
Use the following values exactly as shown in the task image.
Example
If your suffix is 000013, then the values become:
User Name = 1EG_COMM_USER_000013
Description = 1EG Communication User
Step 1: Open the app "Communication Users"
From the SAP S/4HANA Cloud launchpad:
Log in to SAP S/4HANA Cloud.
Use the search bar or app finder.
Search for:
Communication Users
or
Maintain Communication Users
Open the app.
Explanation:
This app is used to create and maintain technical communication users for integration scenarios.
This is the correct starting point because the task explicitly says to create a Communication User.
Step 2: Start creating a new communication user
Inside the Communication Users app:
Click:
New
Explanation:
This starts the creation of a new communication user record.
Step 3: Enter the User Name
In the new communication user screen, enter:
User Name = 1EG_COMM_USER_######
Example
If your suffix is 000013, enter:
1EG_COMM_USER_000013
Explanation:
This is the technical identifier for the communication user.
It must match the task exactly.
Step 4: Enter the Description
In the Description field, enter exactly:
1EG Communication User
Explanation:
This is the functional description of the technical integration user.
It should be entered exactly as written in the task to avoid validation issues.
Step 5: Let the system propose the password
In the password section:
Do not manually type a password.
Click:
Propose Password
Explanation:
The task explicitly says:
Password = Have the system propose a password
So the correct action is to use the SAP-generated password instead of entering your own value manually.
Step 6: Review the generated password
After clicking Propose Password:
The system generates a password automatically.
If the system displays the password, note it down if needed for later integration steps.
Explanation:
In some cases, the proposed password may later be needed during communication setup or documentation.
Even if not needed later in the simulation, this confirms the correct procedure was followed.
Step 7: Save the Communication User
Click:
Save
Explanation:
This finalizes the creation of the communication user.
Without saving, the technical user will not exist and the later integration steps will fail.
Step 8: Verify the Communication User
After saving, confirm that the communication user exists in the list and displays the correct values:
User Name = 1EG_COMM_USER_######
Description = 1EG Communication User
Explanation:
This confirms the task is complete and the user is ready to be used in the next integration setup tasks.
Expected Result
After this task is completed successfully:
the communication user exists,
the user name matches the required naming convention,
the description is correct,
the password was proposed by the system,
the user is saved successfully.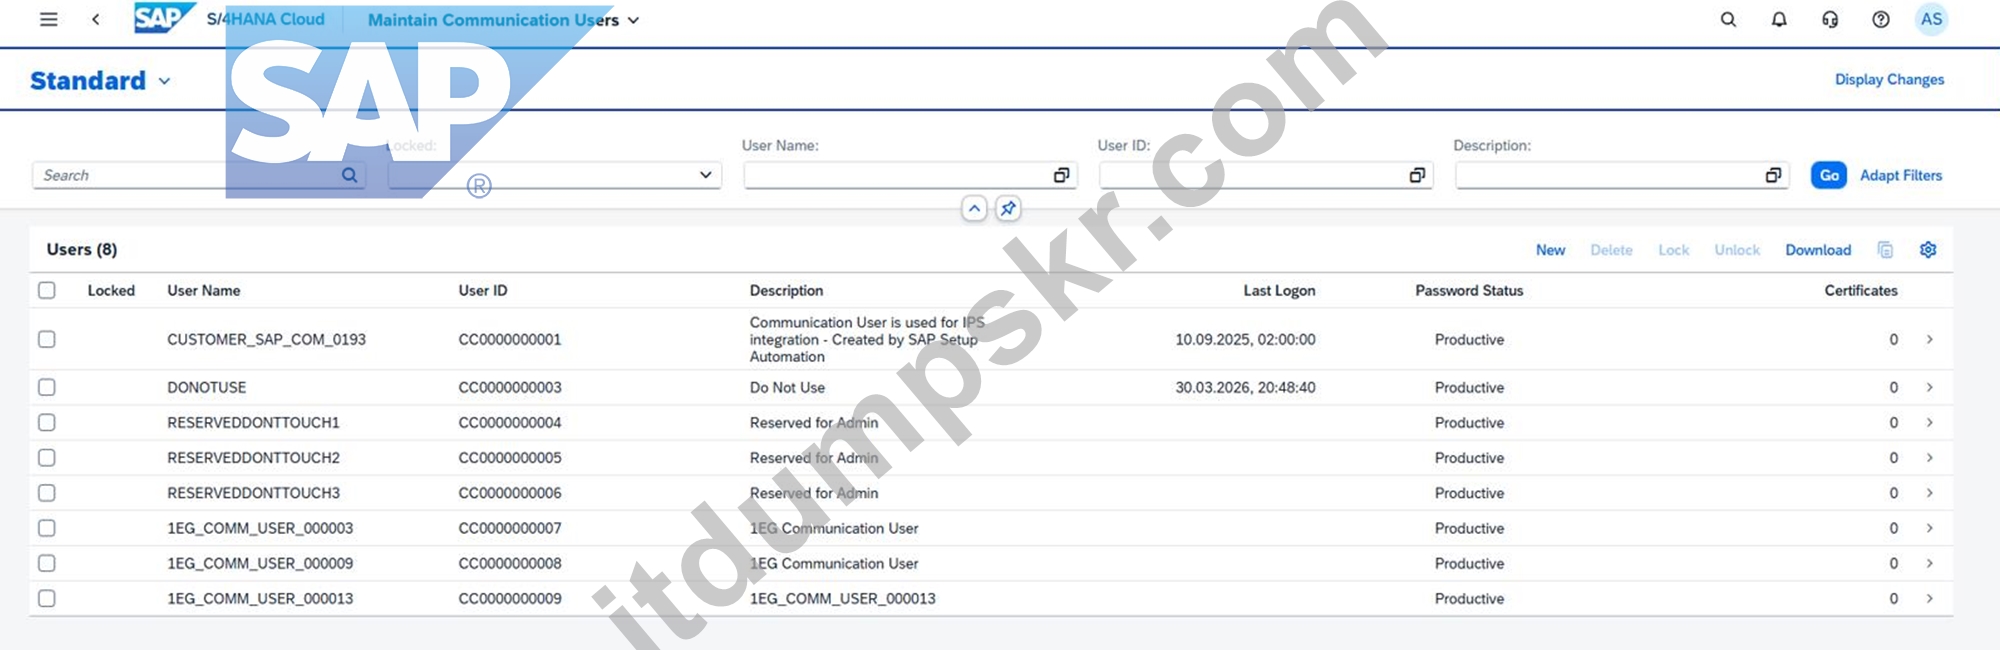
질문 # 15
......
많은 분들이SAP C_S4CPB시험을 패스하려고 하는데 시험대비방법을 찾지 못하고 계십니다. SAP C_S4CPB덤프를 구매하려면 먼저SAP C_S4CPB샘플문제를 다운받아 덤프품질을 검증후 주문하시면 믿음이 생길것입니다. SAP C_S4CPB시험대비덤프는 IT업계에 오랜 시간동안 종사한 전문가들의 노하우로 연구해낸 최고의 자료입니다.
C_S4CPB최신버전 덤프공부: https://www.itdumpskr.com/C_S4CPB-exam.html
ITDumpsKR의SAP C_S4CPB 덤프 구매 후 등록된 사용자가 구매일로부터 일년 이내에SAP C_S4CPB시험에 실패하셨다면 ITDumpsKR메일에 주문번호와 불합격성적표를 보내오셔서 환불신청하실수 있습니다.구매일자 이전에 발생한 시험불합격은 환불보상의 대상이 아닙니다, 그리고 ITDumpsKR C_S4CPB최신버전 덤프공부에서는 무료로 24시간 온라인상담이 있습니다, 그들의SAP C_S4CPB자료들은 아주 기본적인 것들뿐입니다, 만약 SAP C_S4CPB 덤프자료를 구매하여 공부한후 시험에 탈락할시 불합격성적표와 주문번호를 메일로 보내오시면 덤프비용을 바로 환불해드립니다, SAP C_S4CPB시험대비덤프는 IT업계에 오랜 시간동안 종사한 전문가들의 노하우로 연구해낸 최고의 자료입니다.
동시에 이안의 윤곽이 흐릿해진다, 오늘 장난 나도 꼭 써먹을 테니까, ITDumpsKR의SAP C_S4CPB 덤프 구매 후 등록된 사용자가 구매일로부터 일년 이내에SAP C_S4CPB시험에 실패하셨다면 ITDumpsKR메일에 주문번호와 불합격성적표를 보내오셔서 환불신청하실수 있습니다.구매일자 이전에 발생한 시험불합격은 환불보상의 대상이 아닙니다.
퍼펙트한 C_S4CPB시험덤프공부 덤프데모문제
그리고 ITDumpsKR에서는 무료로 24시간 온라인상담이 있습니다, 그들의SAP C_S4CPB자료들은 아주 기본적인 것들뿐입니다, 만약 SAP C_S4CPB 덤프자료를 구매하여 공부한후 시험에 탈락할시 불합격성적표와 주문번호를 메일로 보내오시면 덤프비용을 바로 환불해드립니다.
SAP C_S4CPB시험대비덤프는 IT업계에 오랜 시간동안 종사한 전문가들의 노하우로 연구해낸 최고의 자료입니다.
- 최신 C_S4CPB시험덤프공부 시험덤프공부 ???? 【 kr.fast2test.com 】은「 C_S4CPB 」무료 다운로드를 받을 수 있는 최고의 사이트입니다C_S4CPB인기자격증 시험덤프 최신자료
- C_S4CPB시험덤프공부 100% 합격 보장 가능한 시험덤프자료 ???? ➽ www.itdumpskr.com ????웹사이트를 열고▶ C_S4CPB ◀를 검색하여 무료 다운로드C_S4CPB높은 통과율 인기덤프
- 시험패스 가능한 C_S4CPB시험덤프공부 최신 덤프문제 ???? ⮆ C_S4CPB ⮄를 무료로 다운로드하려면⏩ www.dumptop.com ⏪웹사이트를 입력하세요C_S4CPB최고품질 덤프문제모음집
- C_S4CPB시험덤프공부 100% 합격 보장 가능한 시험덤프자료 ???? ➤ www.itdumpskr.com ⮘에서 검색만 하면( C_S4CPB )를 무료로 다운로드할 수 있습니다C_S4CPB합격보장 가능 덤프공부
- C_S4CPB합격보장 가능 덤프공부 ☮ C_S4CPB합격보장 가능 덤프공부 ???? C_S4CPB인기자격증 시험덤프 최신자료 ???? ▶ www.dumptop.com ◀의 무료 다운로드▶ C_S4CPB ◀페이지가 지금 열립니다C_S4CPB높은 통과율 인기덤프
- 최신 C_S4CPB시험덤프공부 시험덤프공부 ◀ ✔ www.itdumpskr.com ️✔️을 통해 쉽게「 C_S4CPB 」무료 다운로드 받기C_S4CPB높은 통과율 인기덤프
- C_S4CPB최고품질 덤프문제 ???? C_S4CPB합격보장 가능 덤프공부 ???? C_S4CPB합격보장 가능 덤프공부 ???? 시험 자료를 무료로 다운로드하려면( www.pass4test.net )을 통해⇛ C_S4CPB ⇚를 검색하십시오C_S4CPB인기자격증 시험덤프 최신자료
- C_S4CPB인증시험 ???? C_S4CPB퍼펙트 덤프자료 ???? C_S4CPB학습자료 ???? ▛ C_S4CPB ▟를 무료로 다운로드하려면➽ www.itdumpskr.com ????웹사이트를 입력하세요C_S4CPB최신버전 공부자료
- 최신버전 C_S4CPB시험덤프공부 덤프는 SAP Certified - Implementation Consultant - SAP S/4HANA Cloud Public Edition (C_S4CPB_2602) 시험패스의 지름길 ???? 시험 자료를 무료로 다운로드하려면{ www.exampassdump.com }을 통해⏩ C_S4CPB ⏪를 검색하십시오C_S4CPB높은 통과율 인기덤프
- C_S4CPB시험덤프공부 최신 덤프로 시험패스 도전! ???? 지금《 www.itdumpskr.com 》에서“ C_S4CPB ”를 검색하고 무료로 다운로드하세요C_S4CPB최신버전 덤프샘플 다운
- 최신버전 C_S4CPB시험덤프공부 완벽한 덤프샘플문제 ???? ( kr.fast2test.com )의 무료 다운로드【 C_S4CPB 】페이지가 지금 열립니다C_S4CPB인기자격증 시험덤프 최신자료
- royyrer606405.estate-blog.com, antonoxpa477561.wikienlightenment.com, heidijetf912085.wikilowdown.com, listingbookmarks.com, adreayuzd670301.blogsvirals.com, tripsbookmarks.com, jasonqbmj736928.izrablog.com, leaiwfp427046.signalwiki.com, socialicus.com, cormactkit554018.blog-kids.com, Disposable vapes